I have finally joined the Github Actions beta program this week and figured why not play with it for a bit and see what I can do. So my first idea was to automate the deployment process of my blog, this one you are currently reading. I am currently using Jekyll as my static site generator. It works flawless for what I need. I just write whatever I want using Markdown and Jekyll digests everything inside my source folder and spits out HTML, CSS and JS files in a “ready-to-publish” folder where I can just upload to the cloud.
I am currently using Github Pages to host my blog and it has been working perfectly fine for the past couple years.
But how does a Github Action work anyway?
Github Actions is a way to perform tasks automatically for you. To give you an
example, I will use my blog workflow.
It all starts when I want to write a new post. I just create a new markdown
file, write down whatever is on my head and save it. After this whole process, I
need a way to transform my text in a website. Jekyll is doing the heavy-lifting
for me, so I just go to my terminal and type:
1# This command will generate my entire website and all its dependencies2jekyll buildAfter generating all the necessary files, I need to upload it somewhere. In this case, I just have to commit my changes to a specific branch called gh-pages and Github will serve my site on the web. For doing that, I usually perform the following commands in a bash script:
1# This is the folder Jekyll generates with my website. Lets just open it2cd _site3# Now we need a new git repository here,4# so I can commit only the generated files and skip the source files5git init6git config user.name "Bruno Paulino"7git config user.email "bruno@bpaulino.com"8git add .9# That will create a nice commit message with something like:10# New Build - Fri Sep 6 12:32:22 UTC 201911git commit -m "New Build - $(date)"12# Now lets push my commit to the gh-pages branch and replace everything there13REPO=https://brunojppb@github.com/brunojppb.github.io.git14git push --force $REPO master:gh-pages15# Lets do some cleanup here since we don't need the generated files anymore16rm -fr .git17cd ..18rm -rf _siteThat is pretty simple right? It is indeed, but how cool would that be if Github could do that for me instead? That is where Github Actions come to give us a hand.
It all starts with a folder on your repository called .github/workflows.
inside of this folder, create a file called deploy-workflow.yml with the
content below. Each line will be explained with a comment:
deploy-workflow.yml
1# This is the name of our workflow.2# Github will show it on its Website UI3name: deploy4# This configures our workflow to be triggered5# only when we push to the master branch6on:7 push:8 branches:9 - master10 11# Here is where we define our jobs.12# Which means the tasks we want Github to execute13jobs:14 build:15 name: deploy16 # Here we specify in whith OS we want it to run17 runs-on: ubuntu-18.0418 # Now we define which actions will take place.19 # One after another20 steps:21 # This is the first action. It will make sure that we have22 # all the necessary files from our repo, including our custom actions23 # This action here is actually from a remote repo available from Githup itself24 - uses: actions/checkout@v125 # This is our custom action. Here is where we will define our git commands26 # to push our website updates to the `gh-pages` branch.27 # Notice that we are specifying the path to the action here.28 # We will create those files in a sec29 - uses: ./.github/actions/build-dist-site30 env:31 # Now make sure you add this environment variable.32 # This token will allow us to push to github directly33 # without having to type in our password.34 # The GITHUB_TOKEN is available by default35 GITHUB_TOKEN: {{ "${{ secrets.GITHUB_TOKEN"}} }}Now lets create our custom action. Github Actions are divided in 2 types:
- Docker container
- Javascript
We are running our action using a Docker Container. Using Docker, we make sure
the environment where our scripts are running will be the same, no matter what
happens to the Github environment. So, lets dig deeper and create our actions
folder under .github.
1# build-dist-site will be the folder for holding2# our action configuration (Dockerfile, scripts and Metadata)3mkdir -p .github/actions/build-dist-siteUnder .github/actions/build-dist-site lets create 3 files:
action.yml: It will hold the metadata of our actionDockerfile:Will specify our Docker image to run Jekyll in a containerentrypoint.sh:Will have our custom scripts to generate and deploy our website update
Dockerfile
1# Our Docker image will be based on ruby:2-slim2# it is a very light docker image.3FROM ruby:2-slim4LABEL author="Bruno Paulino"5LABEL version="1.0.0"6 7# Lets install all dependencies8# including git and Bundler 2.0.29ENV BUNDLER_VERSION 2.0.210RUN apt-get update && \11 apt-get install --no-install-recommends -y \12 bats \13 build-essential \14 ca-certificates \15 curl \16 libffi6 \17 make \18 shellcheck \19 libffi6 \20 git-all \21 && gem install bundler:2.0.2 \22 && bundle config --global silence_root_warning 123 24# This is our entrypoint to our custom scripts25# more about that in a sec26COPY entrypoint.sh /27 28# Use the entrypoint.sh file as the container entrypoint29# when Github executes our Docker container30ENTRYPOINT ["sh", "/entrypoint.sh"]Now that we have our Dockerfile ready, we need to tell Github to use it. That is
why we need the action.yml file.
action.yml
1# Ok, here the keys are pretty much self explanatory :)2name: "Deploy new version"3description: "Setup Ruby env and build new site version"4author: "Bruno Paulino"5runs:6 using: "docker"7 image: "Dockerfile"The action.yml file tells Github what to do. In this case, just tell it to use
Docker and use our Dockerfile to build the container with it.
Now we just need our entrypoint.sh script to execute our website generation
and deployment. Lets get our hands dirty with a bit of bash script:
entrypoint.sh
1#!/bin/bash2# Exit immediately if a pipeline returns a non-zero status.3set -e4 5echo "🚀 Starting deployment action"6 7# Here we are using the variables8# - GITHUB_ACTOR: It is already made available for us by Github. It is the username of whom triggered the action9# - GITHUB_TOKEN: That one was intentionally injected by us in our workflow file.10# Creating the repository URL in this way will allow us to `git push` without providing a password11# All thanks to the GITHUB_TOKEN that will grant us access to the repository12REMOTE_REPO="https://${GITHUB_ACTOR}:${GITHUB_TOKEN}@github.com/${GITHUB_REPOSITORY}.git"13 14# We need to clone the repo here.15# Remember, our Docker container is practically pristine at this point16git clone $REMOTE_REPO repo17cd repo18 19# Install all of our dependencies inside the container20# based on the git repository Gemfile21echo "⚡️ Installing project dependencies..."22bundle install23 24# Build the website using Jekyll25echo "🏋️ Building website..."26JEKYLL_ENV=production bundle exec jekyll build27echo "Jekyll build done"28 29# Now lets go to the generated folder by Jekyll30# and perform everything else from there31cd _site32 33echo "☁️ Publishing website"34 35# We don't need the README.md file on this branch36rm -f README.md37 38# Now we init a new git repository inside _site39# So we can perform a commit40git init41git config user.name "${GITHUB_ACTOR}"42git config user.email "${GITHUB_ACTOR}@users.noreply.github.com"43git add .44# That will create a nice commit message with something like:45# Github Actions - Fri Sep 6 12:32:22 UTC 201946git commit -m "Github Actions - $(date)"47echo "Build branch ready to go. Pushing to Github..."48# Force push this update to our gh-pages49git push --force $REMOTE_REPO master:gh-pages50# Now everything is ready.51# Lets just be a good citizen and clean-up after ourselves52rm -fr .git53cd ..54rm -rf repo55echo "🎉 New version deployed 🎊"🤯 That was a lot different from what I started with right? Ok, the reason for that is just Docker. Now we have a more robust implementation of our deployment pipeline where we could even move away from Github to Gitlab and reuse the Dockerfile and entrypoint.sh (with minor changes).
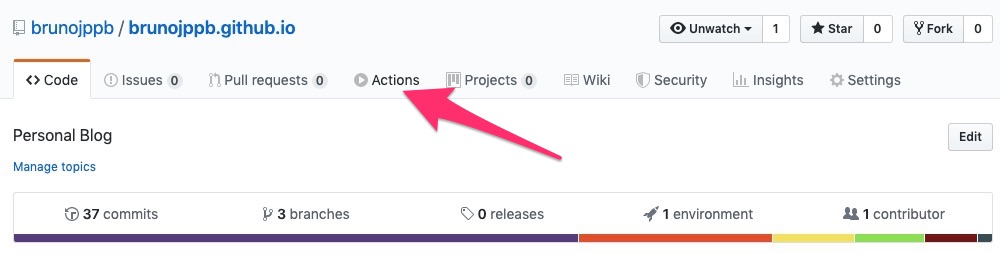
Now that we are armed with those files, lets commit our changes and push to Github and see what happens. Going to our Github repository page, there you can see a new button called Actions:
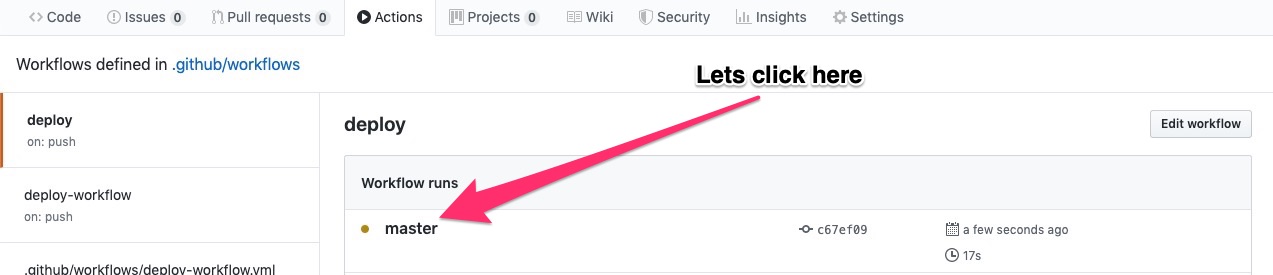
Lets click on it. You will be taken to the Workflows list. There we see our Deploy workflow we just created.
Now inside of our workflow execution context, we can see all of our actions being executed:
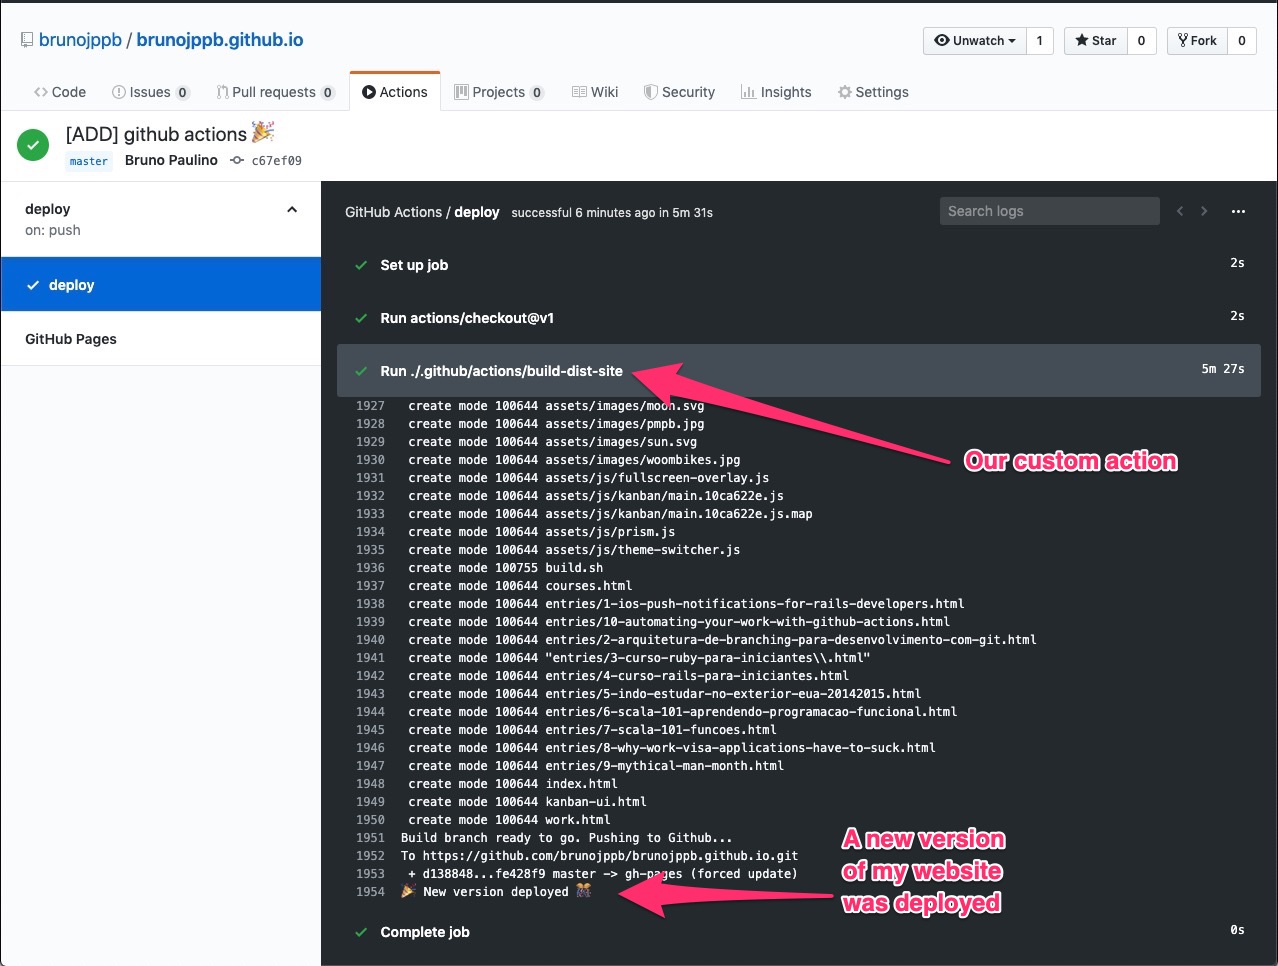
Ok, now our automation work was fully done. As a cherry on top, you can also add a badge to your README.md file showing the current status of your custom actions like that:
1# Where /deploy/ must be replaced with your workflow name2 3That will render a nice image by Github on your repository page with the current
action status. 
Now I can enjoy my time spent building and deploying my website doing something else like playing video games 🎮 or drawing 🎨. Here is the open-source repository of my blog if you want to take a look.