HTTPS for your homelab, at local network speeds
I’ve been self-hosting more and more of my own stuff at home. Photos via
Immich, a handful of internal tools, some experimental services. The way I’ve
been exposing them to the outside world is through Cloudflare tunnels, so I
can reach them at subdomains like i.bpaulino.com from anywhere, over HTTPS,
with a valid certificate. That part is great.
What wasn’t great: when I’m at home, connected to my own WiFi, visiting
i.bpaulino.com still sends traffic out through my router, across my ISP,
over to Cloudflare, back through a tunnel, and finally into my home server
sitting 3 meters away from me. For something like photo browsing, where I
might be scrolling through thousands of thumbnails, the roundtrip adds up.
The “obvious” workaround is to access the service on the local network
directly, at something like http://10.0.0.53:2283. But now I’m dealing with
a different set of annoyances: remembering IP addresses and port numbers, no
HTTPS (so browsers complain), no valid certificates, and a different URL
depending on whether I’m at home or not. I wanted a single URL that works
from anywhere, always over HTTPS, that takes the fast local path when I’m at
home.
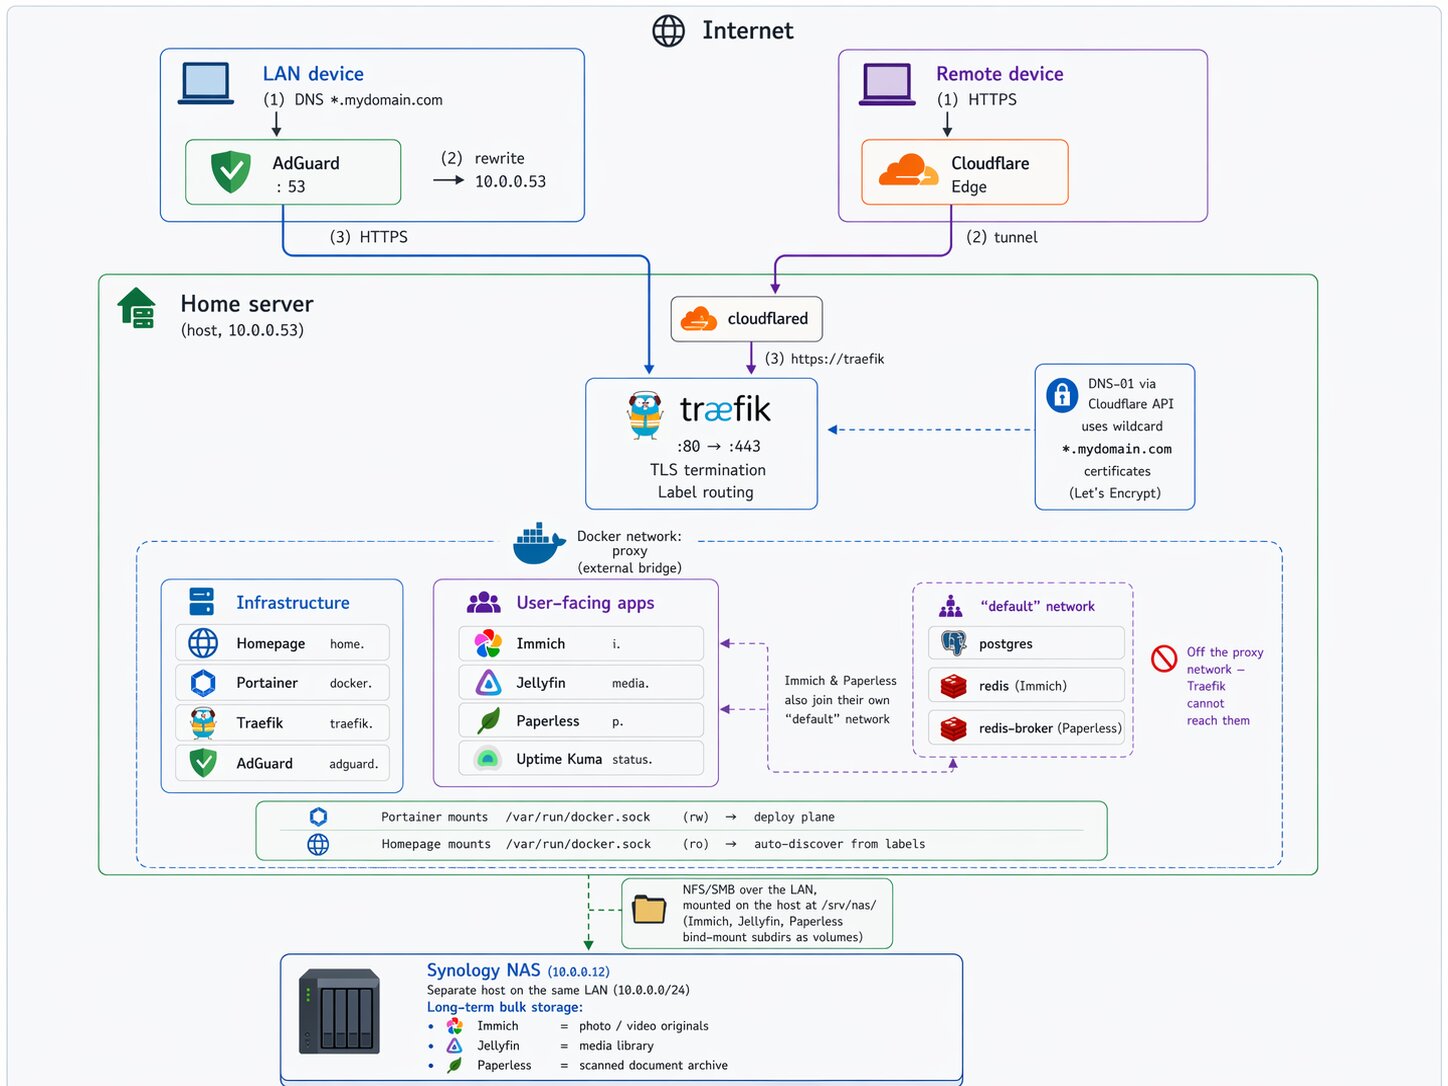
Turns out there’s a clean way to get this. It’s a combination of three things:
- A local DNS resolver that knows your internal services and returns your home server’s LAN IP for them
- A reverse proxy running on the home server that terminates TLS with a valid certificate for those same hostnames
- A small trick with DNS-01 certificate challenges so the reverse proxy can get real Let’s Encrypt certificates for services that are never actually exposed to the public internet
The technique is called split-horizon DNS, and once it’s set up, the same URL works from anywhere, HTTPS always works, and when you’re at home the traffic never leaves your LAN.
In this post I’ll walk through the setup I landed on, using AdGuard Home as the DNS resolver and Traefik as the reverse proxy, both running in Docker managed by Portainer. I’ll use my own values throughout, but the approach works for any domain you own and any home lab setup.
The big picture
Before we start configuring things, it’s worth understanding why this works at all.
DNS doesn’t have one answer. When your phone asks “what’s the IP for
i.example.com?”, it asks whatever DNS server it was told to use. If you
control the DNS server your devices use at home, you can make it answer
differently from the public DNS.
So the plan is:
- From outside your network, your devices use public DNS (Google, Cloudflare, your ISP). Public DNS returns Cloudflare’s IP for your subdomain. The request goes through your existing tunnel. Nothing changes from today.
- From inside your network, your devices use a DNS server you run at home. That server answers with your home server’s LAN IP for your own subdomains, and forwards everything else to a real upstream resolver. The request goes straight to your reverse proxy on the LAN.
- In both cases, the URL is the same, and the certificate is the same (a wildcard cert that covers all your subdomains).
The certificate piece is the clever bit. Normally, Let’s Encrypt proves you
control a domain by putting a file at http://yourdomain/.well-known/....
That doesn’t work for us because the requests we care about never reach the
public internet. Instead, we use the DNS-01 challenge, where Let’s
Encrypt proves ownership by asking you to create a specific DNS TXT record.
Our reverse proxy does this automatically via the Cloudflare API, and the
certificate it gets back is valid everywhere, including for services that
exist only on the LAN.
Before we move along, here is a little diagram showing how this all works together:
What you’ll need
- A home server that runs Docker. Mine runs Ubuntu. Any Linux machine works.
- Portainer for managing Docker stacks. You can also do this with just Docker Compose on the command line; I’ll show stacks because that’s my setup.
- A domain you own, managed by Cloudflare. If you use a different DNS provider that supports ACME DNS challenges, the approach is the same, but some of the specifics change.
- Admin access to your home router.
- A static or reserved IP for your home server on the LAN. Most routers support DHCP reservations. Pin it before you start.
One heads-up: this post walks through a specific stack (AdGuard Home + Traefik). The same idea works with other tools (Pi-hole + Caddy, Unbound + Nginx Proxy Manager, and so on). Pick what feels good; the architecture doesn’t change.
Step 1: get your local DNS resolver running
I picked AdGuard Home because its DNS rewrite feature is straightforward, it supports wildcards, the UI is nice, and it doubles as an ad blocker for the rest of my network. Pi-hole works too.
First, create directories on the host for AdGuard’s config and data. I keep
all my Docker volumes under /opt/<service>, but anywhere works:
sudo mkdir -p /opt/adguard/work /opt/adguard/conf
sudo chown -R $USER:$USER /opt/adguard
Before deploying, one thing to check: is port 53 already in use? On many
Linux systems, systemd-resolved listens on port 53 on loopback addresses.
sudo ss -tulpn | grep ':53'
If you only see systemd-resolved on 127.0.0.53, you’re fine. We’ll
sidestep the collision by binding AdGuard’s port 53 to the LAN IP
specifically, not to all interfaces. If you see something else, investigate
before continuing.
Now, in Portainer, create a new stack called adguard. Paste in:
services:
  adguard:
    image: adguard/adguardhome:latest
    container_name: adguard
    restart: unless-stopped
    ports:
      - "10.0.0.53:53:53/tcp"
      - "10.0.0.53:53:53/udp"
      - "3000:3000/tcp"
      - "8081:80/tcp"
    volumes:
      - /opt/adguard/work:/opt/adguardhome/work
      - /opt/adguard/conf:/opt/adguardhome/conf
Replace 10.0.0.53 with your home server’s LAN IP. Notice the port 53
bindings: they’re bound only to the LAN IP, leaving loopback to
systemd-resolved. Port 3000 is the one-time setup wizard; port 8081
maps to AdGuard’s admin UI (which internally listens on port 80).
Deploy. Then visit http://10.0.0.53:3000 and walk through the setup
wizard. Create admin credentials, pick the LAN IP for both the admin UI and
DNS listeners, and you’re done.
After setup, the admin UI lives at http://10.0.0.53:8081 (the :3000
port is just for the wizard).
Let’s verify AdGuard is actually resolving DNS queries. From any device on your network:
nslookup google.com 10.0.0.53
You should get a real answer. If you do, AdGuard is working as a DNS server. Don’t point your router at it yet though. We’ll come back to AdGuard later. For now, move on to Traefik.
Step 2: get a Cloudflare API token
Traefik is going to need to talk to Cloudflare’s API to solve the DNS-01 challenge. Create a scoped API token before continuing.
In the Cloudflare dashboard, go to your profile, then API Tokens, then Create Token. Use the “Edit zone DNS” template and configure it:
- Permissions:
Zone - DNS - EditandZone - Zone - Read. Both are needed. - Zone Resources: Include → Specific zone → your domain
- Client IP filter: blank (your home IP may change)
- TTL: blank
Copy the token when it’s shown. Cloudflare displays it once. Store it in a password manager.
Verify it works:
curl -X GET "https://api.cloudflare.com/client/v4/user/tokens/verify" \
  -H "Authorization: Bearer YOUR_TOKEN"
You should see "status": "active" in the response.
Step 3: deploy Traefik with a wildcard certificate
Now the fun part. We’ll set up Traefik so it automatically requests a
wildcard certificate for *.yourdomain.com from Let’s Encrypt, and routes
incoming traffic to Docker containers based on labels.
Create the host directories:
mkdir -p ~/docker/traefik/letsencrypt
touch ~/docker/traefik/letsencrypt/acme.json
chmod 600 ~/docker/traefik/letsencrypt/acme.json
The 600 permissions on acme.json are not optional. Traefik refuses to
start without them. That file is where your certificate private key ends
up, and it’s good that Traefik is strict about it.
Traefik has two config layers: static (loaded at startup) and
dynamic (reloaded on changes). Create the static config at
~/docker/traefik/traefik.yml:
api:
  dashboard: true
  insecure: true  # only accessible on :8080 on the LAN, we'll lock this down later

entryPoints:
  web:
    address: ":80"
    http:
      redirections:
        entryPoint:
          to: websecure
          scheme: https
  websecure:
    address: ":443"

providers:
  docker:
    exposedByDefault: false
    network: proxy
  file:
    filename: /dynamic.yml
    watch: true

certificatesResolvers:
  cloudflare:
    acme:
      email: you@example.com
      storage: /letsencrypt/acme.json
      dnsChallenge:
        provider: cloudflare
        resolvers:
          - "1.1.1.1:53"
          - "1.0.0.1:53"

log:
  level: INFO
Replace the email with yours. This is used by Let’s Encrypt to send expiration warnings (Traefik handles renewal automatically, but the email is still worth setting correctly).
A quick tour of what this does:
entryPointsdefines that Traefik listens on 80 and 443. Any request on 80 gets redirected to HTTPS on 443.providers.dockertells Traefik to watch for containers withtraefik.enable=truelabels. TheexposedByDefault: falsemeans containers have to opt in explicitly. No accidental exposure.providers.fileloads a second config file for things that aren’t tied to a specific container, like the wildcard cert request we’re about to set up.certificatesResolvers.cloudflaredefines how to get certificates: DNS-01 challenge via Cloudflare.
Now the dynamic config at ~/docker/traefik/dynamic.yml:
http:
  routers:
    wildcard-cert:
      rule: "Host(`yourdomain.com`)"
      entryPoints:
        - websecure
      service: noop@internal
      tls:
        certResolver: cloudflare
        domains:
          - main: "yourdomain.com"
            sans:
              - "*.yourdomain.com"
This one’s a bit of a trick. The wildcard-cert router exists only to
make Traefik request a wildcard certificate. It routes to noop@internal
(a built-in do-nothing service), but the tls.domains block is what
tells Traefik which certificate to ask for. Without a router that
references the wildcard, Traefik won’t know to request it.
Before deploying the Traefik stack, create the shared Docker network that
Traefik will use to reach your app containers. In Portainer, go to
Networks and create a bridge network called proxy. Or from the
command line:
docker network create proxy
Now the stack. In Portainer, create a stack called traefik:
services:
  traefik:
    image: traefik:v3.2
    container_name: traefik
    restart: unless-stopped
    security_opt:
      - no-new-privileges:true
    ports:
      - "80:80"
      - "443:443"
      - "8080:8080"
    environment:
      - CF_DNS_API_TOKEN=${CF_DNS_API_TOKEN}
    volumes:
      - /var/run/docker.sock:/var/run/docker.sock:ro
      - /home/youruser/docker/traefik/traefik.yml:/traefik.yml:ro
      - /home/youruser/docker/traefik/dynamic.yml:/dynamic.yml:ro
      - /home/youruser/docker/traefik/letsencrypt:/letsencrypt
    networks:
      - proxy

networks:
  proxy:
    external: true
In the stack’s Environment variables section, add
CF_DNS_API_TOKEN with the token you created earlier. The Docker socket
is mounted read-only because Traefik only needs to watch for new
containers, not control them.
Deploy the stack. Watch the logs. Within a minute or so you should see
cert issuance messages ending in something like Server responded with a certificate. Verify:
ls -la ~/docker/traefik/letsencrypt/acme.json
If the file is now several KB instead of empty, Traefik has your wildcard cert stored. Nice. You just got a real, browser-trusted, Let’s Encrypt wildcard certificate for services that will never touch the public internet.
Step 4: route your first service through Traefik
Let’s pick one app and route it through Traefik. I’ll use Immich (photo library) as the example, but the pattern is identical for any service.
Whatever compose you’re running for the app, you need to do two things:
join the proxy network and add Traefik labels. For Immich:
services:
  immich-server:
    # ... all your existing config stays the same ...
    ports:
      - "2283:2283"   # you can keep this as a fallback during testing, remove later
    networks:
      - default
      - proxy
    labels:
      - "traefik.enable=true"
      - "traefik.docker.network=proxy"
      - "traefik.http.routers.immich.rule=Host(`i.yourdomain.com`)"
      - "traefik.http.routers.immich.entrypoints=websecure"
      - "traefik.http.routers.immich.tls.certresolver=cloudflare"
      - "traefik.http.services.immich.loadbalancer.server.port=2283"

  # ... the app's other services (database, redis, etc) stay on default only ...

networks:
  default:
  proxy:
    external: true
The important bits:
immich-serverjoins both networks. The default network is where its siblings (postgres, redis) live, so it still needs that to function internally. Theproxynetwork is how Traefik reaches it.- The
traefik.docker.network=proxylabel explicitly tells Traefik which network to use. Without it, Traefik sometimes picks the wrong one and quietly fails to route. - The port in the last label (
2283here) is the container port, not the host port. Traefik talks directly to the container over the Docker network.
Redeploy the stack. At this point, https://i.yourdomain.com should work
from your laptop, but only if DNS resolves it to your home server’s IP
instead of Cloudflare’s. We haven’t set that up yet network-wide, so
let’s do a quick test by editing your laptop’s hosts file:
sudo nano /etc/hosts
Add:
10.0.0.53 i.yourdomain.com
Then visit https://i.yourdomain.com in a browser. You should get the
app, over HTTPS, with a valid padlock. Run a traceroute to confirm the
traffic stays on your LAN:
traceroute i.yourdomain.com
You should see exactly one hop, and it should be your home server. No cloudflare IPs in the path.
If this works: congratulations, the architecture is proven. Everything from here is just scaling the pattern up. Remove the hosts file entry before moving on.
Step 5: turn on split-horizon DNS
Now we tie it together. Back in AdGuard’s admin UI, go to Filters → DNS rewrites → Add DNS rewrite:
- Domain:
*.yourdomain.com - Answer:
10.0.0.53(your home server’s LAN IP)
One wildcard covers every subdomain. No need to add per-app entries.
One gotcha worth calling out here. If you also host things outside
your network under the same domain (e.g., a blog on Cloudflare Pages at
blog.yourdomain.com), the wildcard will try to send those locally too,
and they’ll break. You have two reasonable options:
- Drop the wildcard and add one rewrite per locally-hosted service explicitly. Slightly more typing when you add a new app, but explicit.
- Register a separate domain just for your homelab and use it everywhere in this setup. This is what I eventually landed on and I think it’s the cleanest design. The wildcard rewrite can’t collide with anything, the wildcard certificate is dead simple, and at a glance any URL tells me whether it’s pointing at my house or at a public cloud provider.
Once the rewrite is in, verify from your laptop:
nslookup i.yourdomain.com 10.0.0.53
# should return 10.0.0.53

nslookup github.com 10.0.0.53
# should return real GitHub IPs
The first query confirms the rewrite works. The second confirms normal DNS resolution still passes through correctly.
Step 6: point your network at AdGuard
This is the step that affects every device on your network at once. Have a rollback plan ready: if something goes wrong, log back into your router and revert the DNS setting to “Automatic” or your ISP’s DNS.
In your router admin UI, find the DNS settings (on my Netgear Nighthawk they’re under Internet Setup). Change the primary DNS to your home server’s LAN IP. Leave the secondary blank, or set it to the same value.
You might think you should set 1.1.1.1 or another public DNS as a
secondary. I wouldn’t. Here’s why: if AdGuard ever goes down, devices
will silently fall back to the public DNS, which will return Cloudflare’s
IPs, which will route all your local traffic back through the tunnel.
You might not notice this for hours. It’s better to have AdGuard be a
real dependency so if it dies, you know immediately and fix it.
Save the router settings. Then, on a test device, force a DHCP lease renewal so it picks up the new DNS server:
# macOS
sudo ipconfig set en0 DHCP
sudo dscacheutil -flushcache && sudo killall -HUP mDNSResponder

# Linux
sudo dhclient -r && sudo dhclient
Verify the device is now using AdGuard:
# macOS
scutil --dns | grep nameserver | head -3

# Linux
cat /etc/resolv.conf
Open https://i.yourdomain.com in a browser. It should just work. No
hosts file, no magic. Every device on your network that picks up the new
DHCP lease now automatically uses split-horizon DNS.
traceroute i.yourdomain.com
# one hop, your home server
You’re done. The same URL works from inside and outside, always over HTTPS, with a valid cert. Inside the house, traffic stays local.
Adding more services
At this point the hard work is behind you. Adding a new service becomes mechanical:
- Make sure the subdomain resolves. If you’re using a wildcard rewrite, any new subdomain is already covered. If you’re using explicit rewrites, add one.
- Add the
proxynetwork and the Traefik labels to the service’s compose. - Deploy.
That’s it. No DNS changes per app, no certificate work per app, no port publishing per app.
Clean up
A few things to do once you’re sure everything works:
- Lock down the Traefik dashboard. Change
insecure: truetofalseintraefik.yml, remove the8080:8080port mapping, and set up a router indynamic.ymlfor the dashboard at its own HTTPS subdomain with basic auth. Traefik has good docs on this. - Remove direct port mappings (like
2283:2283on Immich) for apps now routed through Traefik. You don’t need them anymore. - Back up
acme.jsonand your AdGuard config. Losingacme.jsonis not the end of the world (Let’s Encrypt lets you re-issue), but you’ll hit rate limits if you re-issue too aggressively.
Where to go from here
The setup above is the baseline. Some things you can layer on:
- A service dashboard. Tools like Homepage
or Homarr give you a landing page at something
like
home.yourdomain.comthat links to all your services, with icons and optional live status. Homepage integrates with Docker labels, so your apps can self-register on the dashboard the same way they register with Traefik. - Uptime monitoring. Uptime Kuma is a single-container service that polls all your apps and alerts you when something’s down. Deploy it with Traefik labels like everything else.
- Remote access via Tailscale. If you’d rather not expose anything publicly at all, Tailscale with MagicDNS can do split-horizon DNS for you without running your own resolver. Different trade-offs: no public URL, devices need the Tailscale client.
I’ve been running this setup for a while now and it’s been quietly boring in the best way. Everything works, local access is instant, my phone doesn’t know or care whether I’m at home or not, browsers don’t throw TLS warnings, and adding a new service is a five-minute job.
If you end up building something like this, I’d love to hear about it.